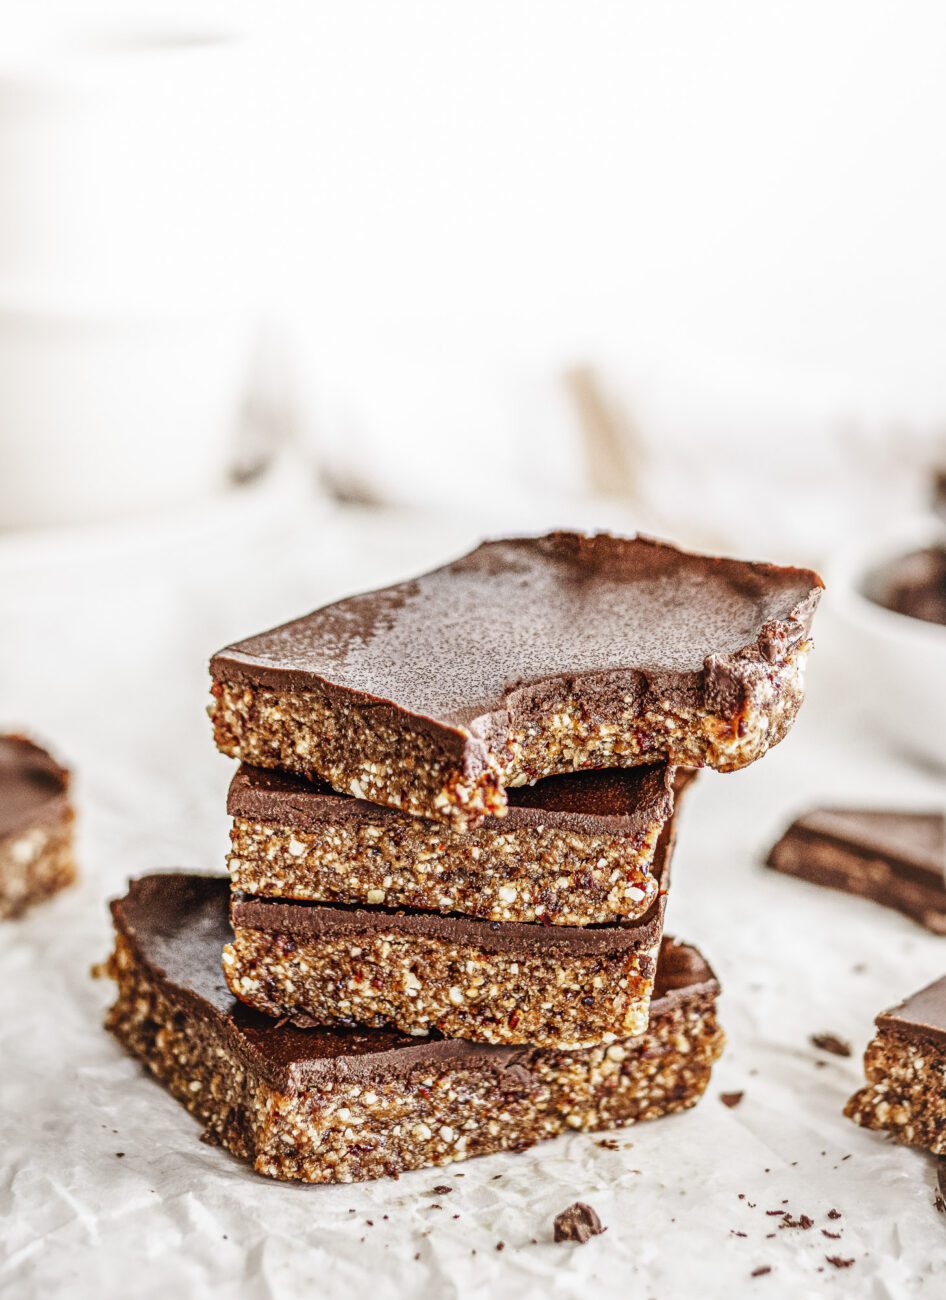
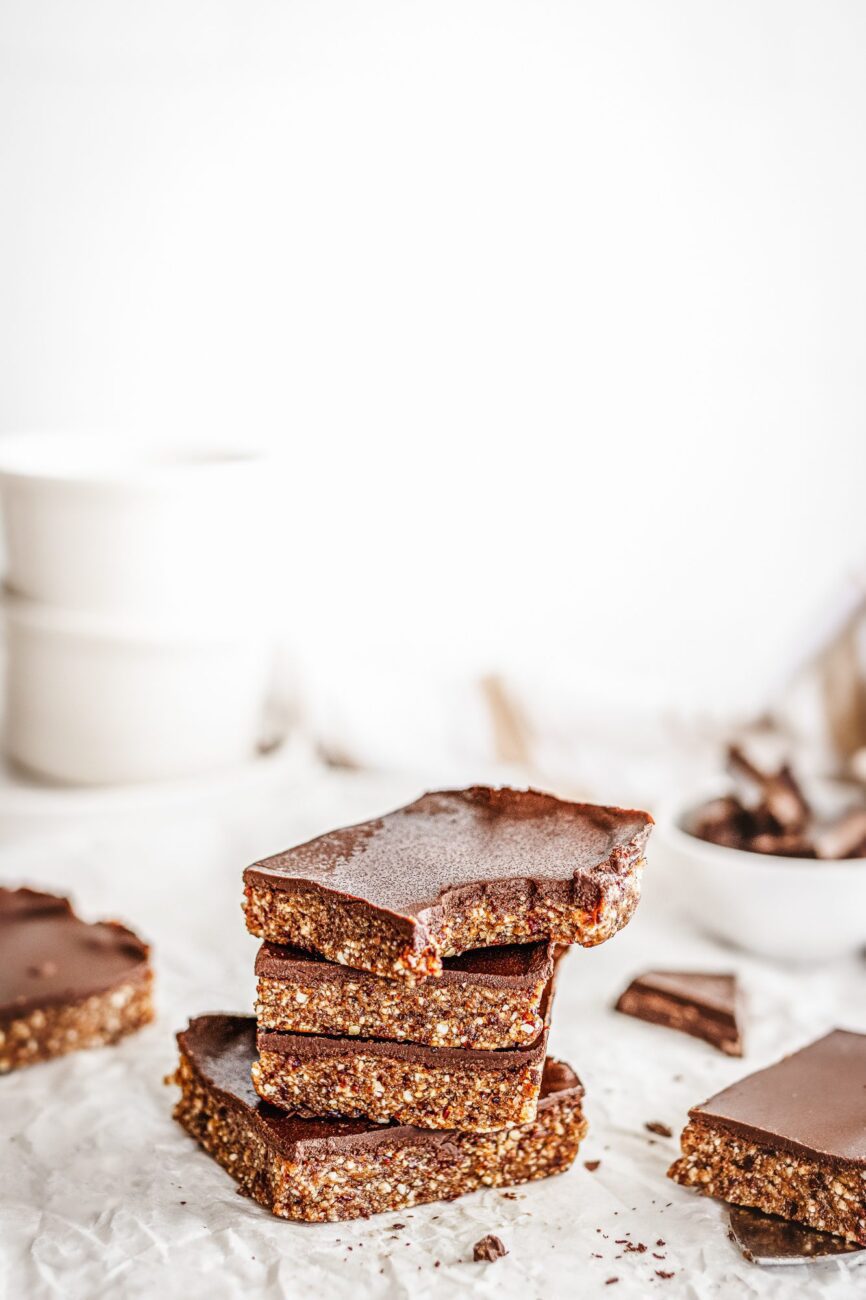
Easy No-Bake Chocolate Oatmeal Squares
These chewy, fudgy no-bake chocolate oatmeal squares are the perfect mix of wholesome and indulgent. Made with oats, dates, peanut butter, cranberries, orange zest, and a glossy layer of dark chocolate, they come together in minutes—no oven required. Whether you call them an oatmeal bar, a no bake oat chocolate bar, or simply your new favourite snack, these squares are packed with flavour, simple to make, and ideal for school lunches, coffee breaks, or weekend treats.
There’s a kind of alchemy in the way no-bake chocolate oatmeal bars come together — the way bake chocolate softens into velvet and folds itself around oats, turning the simplest pantry staples into something nostalgic and deeply satisfying. These easy no-bake chocolate oatmeal bars start with oats that feel grounding and familiar, layered with a chocolate mixture that melts smooth and rich. It’s the kind of treat you’d hope to find waiting in a baking dish … or maybe to an after-school kitchen where someone who loves you left a treat on the counter, or to an office break room where a small square of sweetness saves an otherwise ordinary day.
What I love most is how effortlessly these no-bake chocolate oatmeal squares fit into real life. You stir the peanut butter and chocolate together, let the chocolate and peanut butter mixture swirl into something glossy and indulgent, and then pour it over half of the oat mixture like a warm hug. A quick melt of semi-sweet chocolate — whether you melt chocolate chips in a microwave-safe bowl or use a saucepan on the stovetop becomes that silky chocolate layer that makes these bars feel like more than a snack.
They’re the perfect balance between wholesome and indulgent: Old-fashioned oats or quick cooking oats give the bars their sturdy, chewy backbone; smooth peanut butter, natural peanut butter, or even almond butter or cashew butter brings creamy richness; and a little gooey peanut butter ties everything together. There’s something almost magical about how chocolate peanut butter flavour never fails, especially when mixed with peanut butter oatmeal goodness.
Call them oat bars, chocolate oat bars, bake chocolate oatmeal bars, or no-bake chocolate oatmeal squares that save your afternoon. What matters is how soft and soft and chewy they turn out, how beautifully they freeze well, and how easily they come together with real ingredients — not a long list of unpronounceables. Even the remaining chocolate drizzled on top feels like a small luxury.
These bars welcome creativity, too. If you ever want a twist, swirl in a little banana chocolate, or replace peanut butter with almond butter or cashew butter for a different richness. However you make them, these no-bake chocolate treats truly deliver joy, one no-bake chocolate oatmeal square at a time.
Ingredients you’ll need for no-bake chocolate oatmeal squares
Why you’ll love this these no-bake chocolate oatmeal squares
Serving Suggestions for no-bake chocolate oatmeal squares
Here are some of my favourite ways to enjoy these no-bake chocolate oatmeal squares, think of them as little tips to make each bite even better. When the bars have set and the chocolate has softened into a glossy hush, slice them into little squares, tiny treasures meant to be savoured slowly or shared generously. Slip a few into lunchboxes as a quiet act of care, a wholesome surprise waiting between the busyness of the day. Let them sit beside your morning coffee or afternoon tea, a small pick-me-up that feels like a pause, a breath, a moment reclaimed. And when dinner fades and you’re craving something sweet yet light, serve them with fresh fruit on the side, turning a simple square into a gentle ending to the day.
No-Bake Chocolate Oatmeal Squares
Equipment
- Food processor
- Small bowl (for soaking dates)
- Loaf tin
- Parchment paper
- Double boiler (or heatproof bowl over saucepan)
- Spoon or spatula
Ingredients
- 1 cup almonds or cashews as a substitute
- ½ cup gluten-free oats
- ½ cup dates pitted and soaked in hot water for 5 minutes to soften
- ½ cup dried cranberries
- 2 tbsp peanut butter or almond butter as alternative
- 1 tbsp coconut oil
- 1 tbsp orange juice fresh
- 1 tsp orange zest finely grated
- 80 g chocolate chips ≈ ½ cup
Instructions
- Blend dry base: To a food processor, add cashew nuts or almonds and oatmeal. Blend until the mixture turns into a fine flour-like consistency.
- Soften dates: Place dates in a bowl, cover with hot water, and soak for 5 minutes. Drain and pat dry.
- Form dough: Add softened dates, cranberries, peanut butter, coconut oil, orange zest, and orange juice to the almond-oat mixture. Blend until a sticky dough forms. Adjust texture if needed: add 1-2 tbsp extra orange juice if too dry or 1-2 tbsp extra oats if too wet.
- Press into tin: Line a loaf tin with parchment paper. Transfer mixture and press firmly and evenly into the base.
- Melt chocolate: Using a double boiler or (bowl over simmering water), melt the chocolate chips into a smooth chocolate mixture. Spread evenly over the pressed mixture.
- Chill: Freeze for 20 minutes or refrigerate for 1 hour until firm.
- Serve & store: Slice into bars and store in an airtight container in the fridge for up to 1 week.
Notes
- The oats: Use old-fashioned oats for a sturdy base, or quick cooking oats for a softer bite.
- Gluten Free? Use gluten-free oats if you need the recipe to be fully gluten-free. Rolled oats work best; instant oats may make the texture too soft.
- The peanut butter: For best results, use smooth peanut butter or natural peanut butter. You can also melt the peanut butter slightly before mixing for easier blending.
- The chocolate: Use dark or semi-sweet chocolate chips. You’ll melt chocolate chips in a microwave safe bowl or in a saucepan over a double boiler. Spread half of the chocolate mixture as the base and save the remaining chocolate for the topping if you like it extra indulgent.
- The pan: A lined baking dish makes it easy to press in the base and pour over the topping.
- Chilling: Freezing sets the bars faster (about 20 minutes), while refrigerating (about 1 hour) gives them a softer bite. Either way, make sure they’re firm before slicing.
- Cutting clean slices: Dip a sharp knife in hot water, wipe dry, and then slice through the chilled bars for neat edges.
- Storage: Keep bars in an airtight container in the fridge for up to a week. For longer storage, freeze for up to a month — just let them thaw slightly before eating.
- Serving ideas: Enjoy them as a snack, pack them into lunchboxes, or serve with coffee or tea as a healthier dessert bite.